EdPlace's Upper Key Stage 2 Home Learning Science Lesson: Gravity
For hundreds and hundreds of years humans puzzled over how birds and butterflies stay up in the air - when we can’t.
Over the past two hundred years we’ve been learning about the science of flight, about gravity, friction, air resistance, the nature of the air and so on – and now it’s your turn to get involved in the fun … using paper and card!
Learning Objectives:
1) Discovering how air can support objects and the effects of gravity and air resistance on them
2) How objects can be designed to fly and the effect of changes in their design affect how they fly
3) Learning about design, variables, the importance of fair tests, measuring and concluding
Activity 1: Propellers
First off, get two identical pieces of paper. Scrumple one up into a ball. Hold them both out in front of you and let go. Which one hits the ground first? Why?
They started the same, didn’t they? What did you change? The weight? No, they were identical. The shape? Yes – you made one smaller in size. So, why did that one fall faster? Could it be to do with the air?
As you know, gravity pulls things towards the centre of the Earth – they fall. But the air around the Earth exerts a force too – anything falling has to push it out of the way in order to fall. That’s a type of friction called AIR RESISTANCE.
Get together the following things:
- Some sheets of thin card
- Pencil, ruler, scissors
- Paperclips
- Timer/stopwatch/smartphone (something to time with)
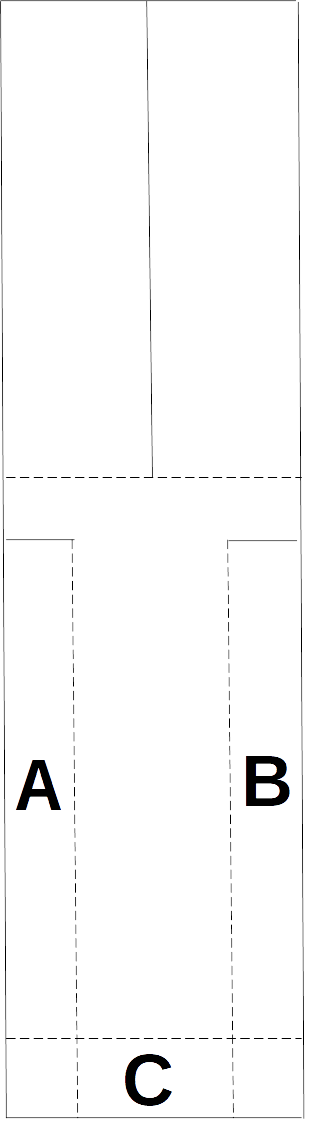
Now, copy this propeller design on to one of your pieces of card – once you’ve done one you can copy it on your printer if you have one:
1. Cut out the propeller
2. Cut along all the solid lines; the dotted lines are for folds
3. Fold over A and B so they meet to make the body of your propeller
4. Fold C up to make the bottom of your propeller
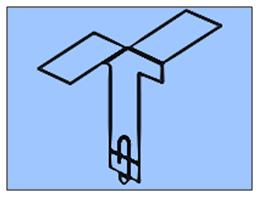
5. Fold the flaps of the propeller in opposite directions so that your finished propeller looks like this: [/userfiles/image/spinner.jpg]
6. Add a paperclip at the bottom
Now test out your propeller by holding it out in front of you and letting it drop – does it spin and fall to the ground? Great! You’ve made a spinning propeller – now it’s time to find out how changing it changes how fast it falls.
Things you can change:
- Does adding more paperclips make it fall faster?
- Does making the wings shorter make it fall faster?
- Does changing the wings from a T-shape to a Y-shape make it fall faster?
Use your timer, stopwatch or the timer on a smartphone to time how long your propeller takes to fall – think about how to make sure each test is fair, so you’re only changing one variable at a time!
Remember - apply the principles of a good investigation:
- PLAN IT
- PREDICT WHAT YOU THINK WILL HAPPEN
- CARRY IT OUT, MEASURING WHAT HAPPENS
- RECORD YOUR TIMINGS
- WHAT HAPPENED? WHAT DID YOU FIND OUT? = CONCLUSION
Activity 2: Paper Planes
How many times have you made a paper dart or plane? Loads? Well, let’s add in an extra dimension – measurement! We can time how long they stay in the air, how far they travel, how adjusting your design changes the way they fly.
Start at the brilliant ‘Fold ‘n Fly’ website, which has loads of different designs for paper plane, and choose one to start with (maybe not too difficult, huh?).
https://www.foldnfly.com/#/1-1-1-1-1-1-1-1-2
Remember: start with a basic design, measure how long it flies/how far it goes, have several goes – then change it: fold the edges of the wings up/cut flaps into the back of the wings and fold up, add a paperclip (weight) to the nose – loads of things! How do changes affect its flight?
Now, just like the propellers investigation, apply the same scientific principles to your plane design/flight:
- PLAN IT
- PREDICT WHAT YOU THINK WILL HAPPEN
- CARRY IT OUT, MEASURING WHAT HAPPENS
- RECORD YOUR TIMINGS
- WHAT HAPPENED? WHAT DID YOU FIND OUT? = CONCLUSION
Hours of fun in the sunshine!
So, how many of the objectives we set out with do you think you’ve achieved?
- Have you seen gravity pulling objects to the ground?
- Have you seen how air resistance affects the speed with which they fall?
- Have you seen how the design of an object changes how fast it falls?
- Have you been able to apply scientific investigative principles like measuring and concluding?
- Great – well done you!
EdPlace Activities to explore online
Want more? Then head to edplace.com and check out…
Now, you’ve had some practice, why not assign your child the following five activities in this order to test their understanding.
All activities are created by teachers and automatically marked. Plus, with an EdPlace subscription, we can automatically progress your child at a level tailored to their needs. Sending you progress reports along the way so you can track and measure progress, together - brilliant!
Keep going! Looking for more activities, different subjects or year groups?
Click the button below to view the EdPlace English, maths, science and 11+ activity library