Suppose we have some alkali which we need to neutralise.
We want to add exactly the right amount of acid - not too much and not too little. This might be because we need to get rid of the alkali, or it might be because the neutralisation reaction makes a useful salt.
Titration is the way we can carefully add acid so that we don't add too much.
Performing a trial titration:
1. Wear protective glasses all the time while doing the experiment.
2. Use a measuring pipette to measure 25 cm3 of alkali and put the alkali in a conical flask.
3. Add a few drops of indicator to the alkali. A good indicator to use is phenolphthalein. This is pink in alkali, and colourless in acid. Since it only has two colours, it changes sharply, so we know when neutralisation has happened.
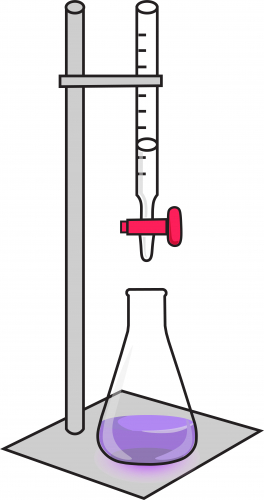
4. Fill a burette with acid. A burette is a long cylinder with a tap at the bottom, and a measuring scale along it. Clamp the burette above the conical flask, and record the volume of acid in the burette at the start of the experiment. The setup should look like this:
5. Open the tap gently, so that acid slowly goes into the flask. Swirl the flask as this happens, so that the solution mixes and reacts fully.
6. The indicator will change colour suddenly. This is called the endpoint because it is when the alkali is completely neutralised. When this happens, close the tap. Record the amount of acid left in the burette.
7. Subtract the final volume of acid from the initial volume of acid. This difference tells you how much acid was needed to neutralise the alkali.
Once you have done a trial titration, you should do several accurate titrations.
Performing an accurate titration:
Steps 1 to 5 are the same as before. Once you have added 1 cm3 less acid than the rough titration needed, stop.
6. Add the rest of the acid, very slowly - drop by drop, swirling all the time. Just before you reach the end point, you will see pink and colourless regions in the flask at the same time, a bit like in this beaker:

7. When the solution in the flask is all colourless, and stays colourless after swirling, stop adding acid. Record the amount of acid left in the burette.
8. Subtract the final volume of acid from the initial volume of acid. This difference tells you how much acid was needed to neutralise the alkali.
9. Repeat the accurate titration until you have three results which agree to within 0.1 cm3.
The titration method has lots of steps - the key to learning them is to remember that we are trying to find out how much acid it takes to neutralise this particular alkali; that we need to measure this very accurately and precisely (so we add the acid very slowly); and that we need to be safe (so we wear goggles, and put the alkali in the flask).
The following questions will help you think about these ideas some more.