EdPlace's Year 4 Home Learning Science Lesson: Sound
Looking for short lessons to keep your child engaged and learning? Our experienced team of teachers have created English, maths and science lessons for the home, so your child can learn no matter where they are. And, as all activities are self-marked, you really can encourage your child to be an independent learner.
Get them started on the lesson below and then jump into our teacher-created activities to practice what they've learnt. We've recommended five to ensure they feel secure in their knowledge - 5-a-day helps keeps the learning loss at bay (or so we think!).
Are they keen to start practising straight away? Head to the bottom of the page to find the activities.
Now...onto the lesson!
So, let's see if this sounds about right...
During lockdown it’s possible that sound has found a greater meaning to your life than before: it might have given you a chance to explore more music, to actually notice birdsong, the sigh of the wind in the trees, the sound of a waterfall; whatever, all these have one thing in common – they all produce vibrations and reach your ears by changing the air around you. So, perhaps your young scientist finds the sound of vibrations and particles, of pitch and volume, just gives them an ear-bashing they could do without. Well, you’ve come to the right place, because at EdPlace we’re in the business of making learning fun, entertaining and absorbing. Let’s get stuck into sound!
We're sure if you do, your child will be able to:
1) Understand how sounds are made and travel to our ears. Also, how sounds get higher, lower and change in volume.
2) Apply this understanding
3) Explain the different parts of sound covered in this lesson back to you.
Step 1: Good vibrations... and that's not just grandpa humming!
OK, so, first of all, let’s try to get an overview of what it’s about. Let’s start with first principles:
1. For anything to make a sound at all, the object has to vibrate. That means it has to move backwards and forwards a tiny amount, but very fast.
2. That’s fine, but if no one’s there to hear it, does it make a sound? Yes, of course, but to be able to hear it, those vibrations must travel to your ears. That means the air (or water, etc.) has to be able to transmit the sound for you to hear it.
3. When the vibrations of the sound get bigger the sound gets louder. That’s an increase in volume.
4. Then, if the sound you hear gets higher or lower, it’s changed in pitch – higher pitched notes go “eeeeeeeeeeee” (and make you clap your hands over your ears if they’re really high!), while low-pitched notes go “oooom, booom, bom”, way down there.
Now, it’s easy to get lost in all this, but keep it simple: twang an elastic band - you can see it vibrating, you can hear it twanging and you can change the way it sounds by twanging it differently.
Let’s have a closer look……….
Step 2: Or is there deafening silence?
This idea of sounds being made by something vibrating – it’s not obvious, so we have to explore that in order to get it sorted.
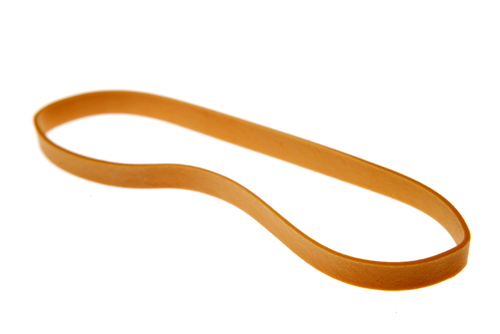
That elastic band idea is worth checking out: see whether your young scientist can track one down. If so, something like that will help.
If you hook it around a door handle and pull it fairly tight, then twang it …. can you hear it? Look at it: can you see it vibrating as it makes a sound? It’s moving very fast, to and fro. That’s vibrating.
So, this elastic band vibrates and make a sound. That’s how sounds are made! But how do you hear it?
Imagine the moving elastic band pushing against the air that surrounds it, as it vibrates. The way that it pushes against the air is exactly the same as the way it vibrates … so it makes the air vibrate too! That’s like putting your hand in a bowl of water and waving it from side to side – the water moves too.
The air transmits that vibration in all directions, like ripples on the surface of a pond. That’s how those vibration ripples reach your ear, carrying the sound to you. In fact, they work even better if you’re underwater as liquids carry sound better than air!
Step 3: ...what was that about a football pitch?
OK, so have we nailed down the fact that sounds are made by the object vibrating and sending sound out through the vibration of the air (or water) to our ears?
Next, then, we want to see what happens when we change those vibrations. That’s what all scientists (including your young scientist) love to do: check out, “what happens if I …..”???
Still got that elastic band on the door handle? Pull it tight and give it a twang. OK, now twang it gently.
What happens? It’s quieter, isn’t it?
What’s happening to those vibrations? They’re smaller, aren’t they? Look closely, if you can...
Predict what happens if you twang it harder. Were you right? Again, look at how it vibrates.
So, you’ve changed the volume of the sound by making the vibrations smaller and then bigger. That means the vibrations reaching your ear are smaller (quiet sounds) or bigger (loud sounds).
Still got that elastic band handy? Twang it once more – now pull it a little tighter and twang it again. Did you notice a higher note? You’ve changed the pitch of the note – it’s now higher-pitched than before.
So, what have we got?
Higher volume = bigger vibrations = loud sound (like a motorbike).
Lower volume = smaller vibrations = quiet sound (like you breathing).
Higher pitch = faster vibrations = high-pitched note (like a mouse squeaking).
Lower pitch = slower vibrations = low-pitched note (like thunder in the distance).
Well, does that sound better now? Have we achieved perfect pitch? Ready for some questions to see?
Let’s check it out...
Step 4: Putting it into practice...
So, let’s see whether you can use what we’ve been looking at to answer these five questions. Then we’ll see what the EdPlace site has to offer to continue bringing music to your ears!
1. What does a megaphone do to make a sound?
2. What do you think that does to the air around the megaphone?
3. If the person speaking into the megaphone starts shouting, what happens to the volume of the sound?
4. How will that change the vibrations of the sound coming from the megaphone?
5. Imagine a violin and a cello...When the bow is scraped across the strings of the violin, it plays higher notes compared to the cello. What do we call the change in the sound which creates higher and lower notes?
Step 5 - Is your knowledge sound? Let's put it to the test...
Now, you’ve covered this together why not put this to the test and assign your child the following five activities in this order:
All activities are created by teachers and automatically marked. Plus, with an EdPlace subscription, we can automatically progress your child at a level tailored to their needs. Sending you progress reports along the way so you can track and measure progress, together - brilliant!
Activity 5 - Travelling Sounds
Answers
Hope that made sense and was easy after the work we’d done!
1. As someone speaks into the megaphone it sends out the vibrations of the sound into the air so people can hear their voice.
2. Those vibrations are transmitted to the air, so the air vibrates too, in all directions, sending the sound out. If your ears are within those ripples of vibration, you’ll hear the sound of the voice!
3. If that person starts shouting the volume increases as they are making a louder sound.
4. That creates larger vibrations in the sound – they are bigger when they reach you, so the voice sounds louder.
5. The change in how high or low a sound is called pitch. The violin makes higher-pitched notes compared to the cello, so it sounds more “squeaky”! In terms of vibrations, the higher-pitched sounds vibrate faster than lower-pitched sounds.
Keep going! Looking for more activities, different subjects or year groups?
Click the button below to view the EdPlace English, maths, science and 11+ activity library
All English, maths and science from Year 1 - GCSE