EdPlace's Upper KS2 Home Learning Science Lesson: Circuit Diagrams
Looking for short lessons to keep your child engaged and learning? Our experienced team of teachers have created English, maths and science lessons for the home, so your child can learn no matter where they are. And, as all activities are self-marked, you really can encourage your child to be an independent learner.
Get them started on the lesson below and then jump into our teacher-created activities to practice what they've learnt. We've recommended five to ensure they feel secure in their knowledge-5-a-day helps keeps the learning loss at bay (or so we think!).
Are they keen to start practising straight away? Head to the bottom of the page to find the activities.
Now...onto the lesson!
Let's See Whether You Need To Electrify Your Current Thinking
Electric things are so much part of our lives! Gaining a current understanding of how electricity does what it does is vital life learning. So, is it OK to add more and more stuff into a circuit and will it work the way you want it to? It’s time to switch on the memory cells and get ready for a flow of charged articles.
At EdPlace we’re surrounded by a team of experts who communicate these concepts with children on a day-to-day basis, and we’re ready to share their teaching gems with you. Every good lesson has a purpose or an objective. We’re confident by the end of this that your child will:
1) Recognise the different circuit symbols
2) Understand the way a circuit should be drawn
3) Apply this understanding to circuit diagram questions
4) Explain this back to you (if they've really cracked it!)
Step 1 - Time to switch into concentrating mode...
Now, like so many things in science, it’s really important for your young scientist to be able to relate the stuff they do here and in the classroom to real life. Electric circuits are a great example and you don’t have to look too far to see circuit diagrams for your house, car, smartphone, TV and so on – they’re very common things. So, having a good understanding of how circuits work and what the symbols mean is really useful. So, let’s start with the basics and go from there:
Now, remember – electric current won’t flow unless it’s got a complete circuit to flow around. In Y6 things are still pretty simple and you’re only dealing with a series circuit, which is simply a single complete loop. So, what’s powering the electricity – making the current flow?
The cell = 
An electrical cell (a battery contains several cells) pushes electric current around a circuit. Its symbol is the long/short line (with the long line being the + end of the cell).
The electric wires are simply drawn as lines:
A lamp = 
So, a drawing of a simple series circuit of one cell powering one lamp looks like this:
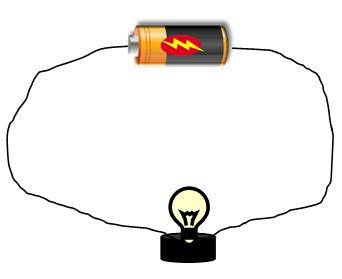
Would you agree, that’s a bit of a faff to draw like a picture and takes ages - so let’s try it as a circuit diagram instead – like this:
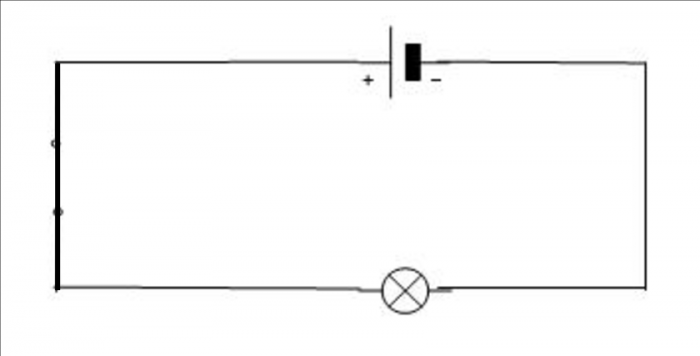
Isn’t that simple? Just a cell (two lines), a lamp (circle with an X in), and lines to join them together.
So, what have we got: a series circuit (one continuous loop), powered by a cell which pushes the electric current around, and components (like a lamp) which turn on with that current.
OK? Well, now that’s sorted, let’s go through the components your young scientist needs to know and then we can try out a few circuits to get things into context.
Let’s power up that understanding...
Step 2 - You don’t need to blow a fuse to get these diagrams nailed.
Right, let’s start with a simple list of the components that are used at Year 6 – see whether your young scientist can find pictures of the actual components they use in science lessons to compare the circuit symbols we’re going to use here:
= one cell (you’ll generally find 1/2/3 of these in a line)
= one lamp (again, circuits may have more than one)
= one switch (open = no current flows; closed = current can get through)
= one buzzer (looks a bit like a speaker, sending out the sound)
= one motor (just like in your drone)
Now, any of these components can be put together in a circuit. If you want to find out if the circuit works, just ask: a) is the circuit complete? (that means, no gaps); b) is the switch closed to allow electric current through? c) if there’s more than one cell, are they all facing the same way? (just like in your torch).
Step 3 - Are you ready to complete the circuit and enjoy that light bulb moment?
So, let’s have a look at a few circuits and see what’s going on. You get your young scientist to predict what they think will happen, then reveal the answer to check. Then, once we’re happy with that, let’s try out some proper questions.
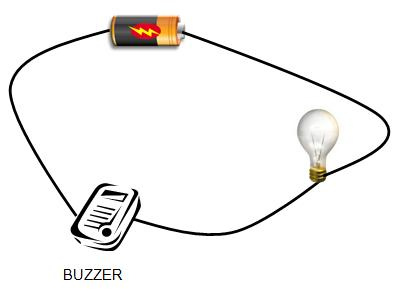
What’s connected in this circuit?
Will it work?
What should you see/hear when it’s turned on?
OK, we’ve got a cell, lamp, and buzzer all connected in series. No gaps, so it should work fine. If so, you’d see the lamp shine (normal brightness) and the buzzer will make a sound.
What’s next?
What have we connected together here?
How will we make it work?
What will happen?
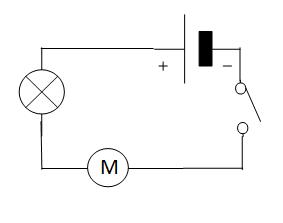
This time there’s a series circuit consisting of a cell connected to a lamp, motor and switch. To make it work you’d have to close the switch to complete the circuit and allow the current to flow. When that happens, the lamp will come on and the motor will start to turn. Simples!
Shall we try one more?
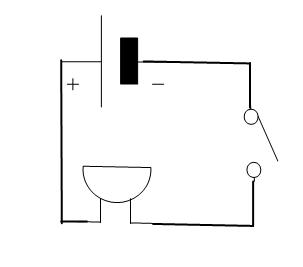
Again, what’s connected here?
What will happen when either or both switches are closed?
How do you think we could make it work?
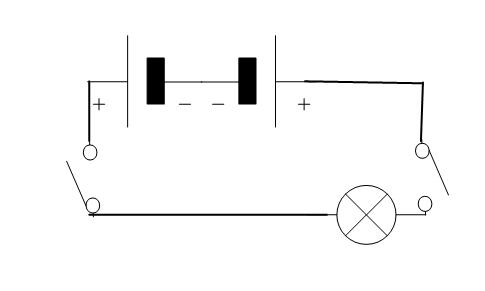
Now, this one’s a little trickier. Remember, for a circuit to work what do we have to have? A complete circuit and cells connected in the same way.
This time, if we close one switch, there’s still a gap – until we close the other switch as well. However, look at the two cells – they are facing opposite ways: negative end to negative end. That won’t work!
So, to make the lamp come on, you’d have to turn one of the cells round and close both switches! That needed some thought!
However, do you feel that your young scientist is getting the hang of this? In trying to work out what will happen, the symbols fall into place and it begins to make sense. Yes?
In Years 7/8 they’ll be introduced to more components, parallel circuits, and so on and it makes a massive difference if these basics are all solid and in place. Ready to try some questions?
Great! Let’s check it out...
Step 4 - time to see whether your young scientist is a circuit powerhouse!
So, let’s start off with converting pictures into circuit diagrams. Look at the circuit picture and draw out on a piece of paper what the circuit diagram should look like, with the correct symbols. Got that?
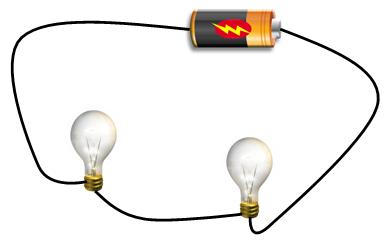
1.
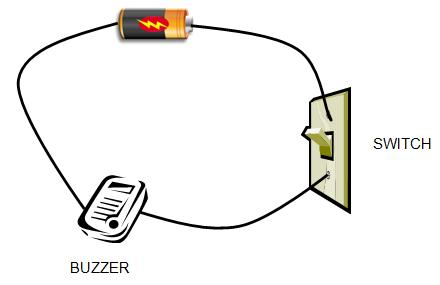
2.
3.
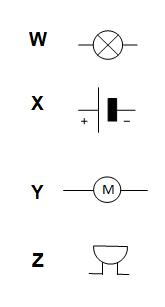
Next – simply decide what each of these symbols represents:
4.
5. Finally, here are three series circuits containing lamps and cells:
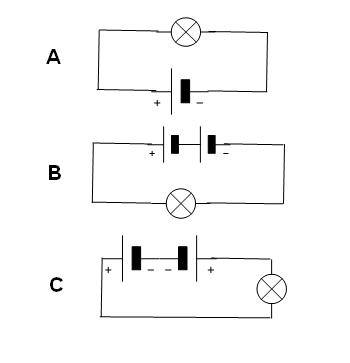
Simply decide which lamps are on and also whether any are brighter than others.
Step 5 - Activity Time
Now, you’ve covered this together why not put this to the test and assign your child the following five activities in this order.
All activities are created by teachers and automatically marked. Plus, with an EdPlace subscription, we can automatically progress your child at a level tailored to their needs. Sending you progress reports along the way so you can track and measure progress, together - brilliant!
Activity 1 - Simple Circuits 2
Activity 3 - Circuit Diagrams 1
Answers:
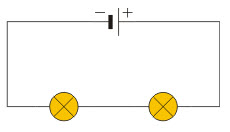
1. OK, so that’s one cell in series with two lamps. The order in which the components are drawn doesn’t matter, and the cell can be drawn either way round (as there’s only one), but it’ll look something like this:
2. This one is a cell in series with a switch and a buzzer, so something like this (again, the actual order doesn’t matter):
![]()
3. The third circuit is similar: a cell in series with a lamp and a buzzer, so something like this:
![]()
4. Hopefully, those circuit symbols were very straightforward:
W = lamp/bulb
X = cell
Y = motor
Z = buzzer
5. In the final set of three circuits, the task was to decide which lamps were on and to decide if any were brighter.
Well, in circuit C did you notice that the cells are ‘back-to-front’? Since they’re facing different ways, no current will flow in that circuit, so the lamp is not on.In circuits A and B, the lamp is on in both, but B has got two cells (twice the power), so the lamp in B will be brighter than the one in A. Make sense
Keep going! Looking for more activities, different subjects or year groups?
Click the button below to view the EdPlace English, maths, science and 11+ activity library